Introduction
If you’re doing your research about interactive software simulations, you probably realized most articles on the subject show you the way to create the same old screenshot or slide presentations you’ve done since forever.
These static simulations will never provide full interaction because:
#1: they lack realism (they don’t look or behave like the live system);
#2: they don’t offer maintainability (whenever the system changes, you start over from scratch);
#3: they are hard to localize and anonymize (bulk find-and-replace is not an option, and for multilingual users, you’ll have double, or triple the work);
The bottom line is: you can spend lots of your precious time creating a simulation that does not deliver a real-life feel. This will undermine users’ engagement and hamper their learning progress and efficacy.
This article presents the steps to create software simulations that are unmistakably interactive. We will show you how easy this process is and how the outcome can be truly game-changing for your e-learning – especially for use cases such as:
- Multilingual training
- Material with sensitive data
- Maintainability over time
- Training before the system goes live
What makes a good interactive software simulation?
When you conclude that truly interactive software simulations are the way to go, some elements should be unnegotiable. Each one of them is key to uncover an optimal outcome with minimal effort. Here they are:
Realistic on-screen experience – This is the key aspect to provide your courses with a real-life feel of the software. Users should be able to take actions right on the screen that provide a complete notion of what the live system will be. This element triggers effective learning by leveraging your users’ intuition.
No risk for production – Creating interactive software simulations that are independent of real systems is critical to avoid disruptions or incidents of any kind. Thanks to the technology available today, users can have a hands-on experience with a realistic feel in a 100% safe environment.
Easily editable objects – When it comes to efficient interactive software simulations, editing elements must be user-friendly and uncomplicated. Actions like moving objects from place to place, bulk find-and-replace, and enabling multiple languages should take no more than a few clicks.
Easy maintenance – Being able to maintain your software simulation with the least possible effort is critical to driving optimal efficiency. Whenever new training is needed for system updates, you should be able to easily reuse previous lessons, saving you the hassle of starting it all over. You can also anticipate updates by adding upcoming features before they go live.

A step-by-step guide to create software simulations with true interaction
Now you will see how to uncover genuine interaction in your software simulation with Assima’s Authoring Tool. This is an unrivaled, patented technology that unlocks unique interaction in your learning experience with maximum efficiency and zero time wasted.
We will guide you through each one of the steps of the process and clarify how Assima’s tool outperforms any other conventional software simulation.
Disclaimer: Assima is our own simulation authoring tool. Learn more here, and when you’re ready, book a personal demo. You’ll get expert advice tailored for your specific use cases and industry. Join companies who use us, like Airbnb, Bank of America, Toyota, and more.
Step 1: Cloning your software
The core of Assima’s Authoring Tool is its patented cloning technology that allows users to do a base capturing of the objects they see on their system’s screen. This technology does not do actual cloning of the software, but a copy of the UI elements users see on the system’s interface.
Your cloning process starts by selecting the desired project inside Assima’s tool. Next, you’ll create a lesson that will contain the exact cloning you want to do at this point. Here, you must ensure your browser is set up by the Authoring Tool to allow the capture of the objects on the screen.
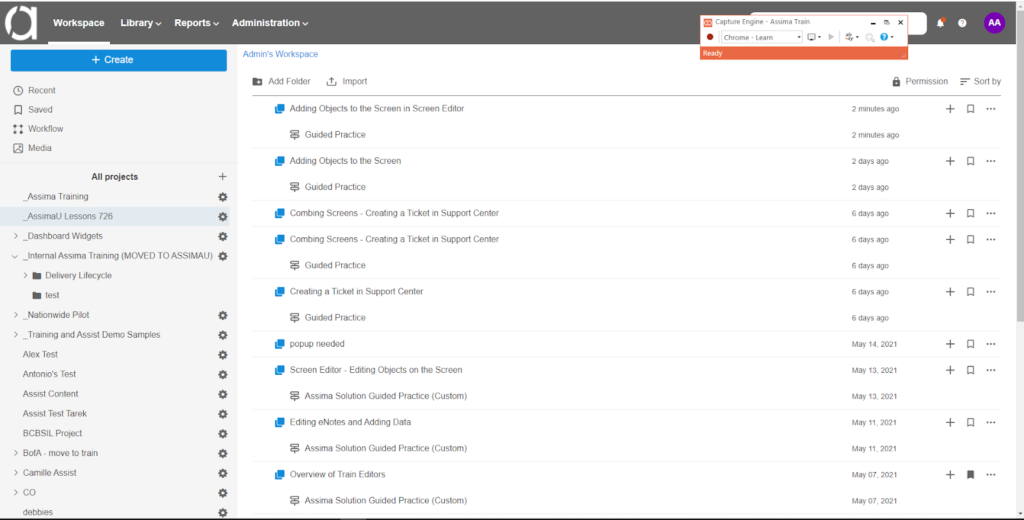
Now that you created your lesson, it’s cloning time. Once you launch the cloning engine on Assima’s system, all you have to do is go to the system you want to simulate, press the ‘Capture’ button on the toolbar, and the screen will be captured.

When the tool finishes the capture, you will be able to import whatever was cloned into your lesson. This action builds the base clone that contains all the screens and objects that you will edit later.
Step 2: Editing objects & features
This is where you step in as the author of your software simulation while benefiting from the critical edge Assima has over other elearning authoring tools. After the base clone is done, you will modify the objects to fit your needs, unleashing ultimate interactivity in unparalleled time and with a hyper-realistic user experience.
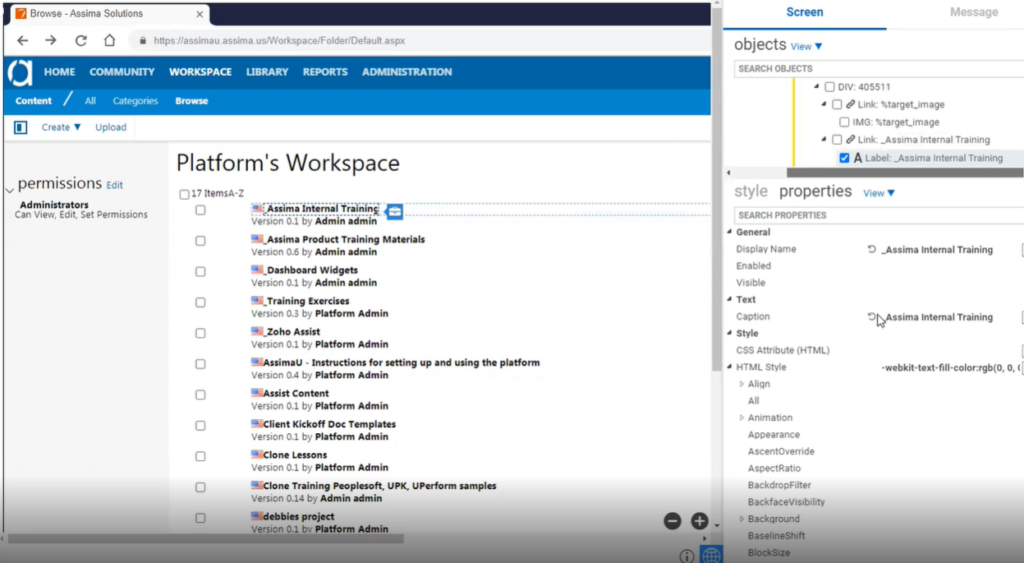
For each cloned screen, Assima’s elearning authoring tool keeps a list of all captured objects for you to edit. When you click on any item at the screen in the tool, it takes you to the object list, where you can change its properties, such as text or color, or modify its shape and position. You could also add objects that are not on the original screen, like buttons.

Assima is the world’s only tool that captures application screens as editable objects – allowing you to change any UI elements and replace any data across lessons in record time.
The objects you can edit with Assima’s tool are not only static images or text. The cloning technology also captures more dynamic elements, such as dropdown menus, and all their features can also be edited according to your needs. And if any cloned detail does not match the actual system, this can be easily changed afterward by the Assima product team.
When you edit your features in Assima’s Authoring Tool, the difference between a clone and the regular static screen copies will be more than evident.
In a slide presentation, every edit demands a different screenshot, which can take a long time to do and is hard to maintain. With the interactive simulation, editing takes a few minutes, and one screen is all you’ll need to create one learning. Besides, the high-quality output is visually identical to the live system, delivering a hyper-realistic user experience that static slides can’t replicate.
Step 3: Finding and replacing content
Assima’s patented cloning technology also allows you to perform bulk find-and-replace to easily and quickly modify content all through the base clone. Of all the steps presented here, this one is crucial for a more efficient maintainability of your software simulation. While in a static screenshot you must edit the images one by one, the interactive simulation provides mass content replacement in no more than a few clicks.
Multiple data sets from a single source
This is leveraged by the fact that, with Assima’s Patented Authoring Tool, you can have multiple data sets, as many as you want, from one single source lesson file. Those data sets can be selected, from your lesson’s settings, and be applied to specific users, groups, or departments.
Anonymization
The bulk find-and-replace capability also enables you to anonymize and protect whatever risky data is captured in your simulation, like customers’ information, for example.
Step 4: Choosing your languages
The same capability that provides easy bulk find-and-replace makes it possible for Assima’s users to output the software simulation in different languages. Again, this technology uses a single source lesson file, so selecting languages does not require either recapturing or taking multiple screenshots, like static software simulations or slide presentations.
This gives Assima’s customers an invaluable edge when training multilingual teams in the same system, as well as for adapting the lessons for international users in the future. As for the languages available, Assima’s dictionaries reflect all languages supported by Windows.
Step 5: Selecting your preferred outputs
Once you are finished editing your software simulation, you can choose any output you prefer for your lessons from a list of options (or modes) provided by Assima’s Patented Authoring Tool.
You can make your simulation accessible on a browser, for example, create a test out of it (or evaluation), turn it into a guided practice, or use it to generate documentation, like user manuals or any tutorial you may need.

These outputs can be used for different scenarios, purposes, countries, groups, or departments, always from a single source lesson file. This capability also highlights these software simulations’ potential not only to provide engaging, effective e-learning experiences, but also to drive efficiency by saving time and resources for content developers.
Changing your game through genuine interaction
If you are looking for fully interactive software simulations, you should not settle for conventional slides or something like a Powerpoint presentation.
Being able to automatically emulate your live system, capturing all the fields, images, and dropdown menus, and having them working on screen, is something that screen copy tools and slide presentations simply won’t provide.
Choosing the right software simulation tool is key to unlocking a real-life experience for your software training sessions, so you captivate people and drive learning through intuition and hyper-realism in a 100% safe environment for production. Besides, easily editing, adapting, and maintaining lessons will uncover unprecedented efficiency for your L&D teams and your organization as a whole.
Interaction is not just a new e-learning method. It is a true game-changer for your business.
